| This post was kindly contributed by The SAS Dummy - go there to comment and to read the full post. |
Windows PowerShell is one of my favorite tools to use for gathering information from my PC and network, and also for automating processes. If you are familiar with UNIX shells (such as Korn shell or its variants), you will probably be very comfortable with Windows PowerShell. Just like its UNIX predecessors, Windows PowerShell allows you to run commands and combinations of commands from an interactive console window. You can also write PowerShell scripts (saved as PS1 files), which allows you to combine the commands and programming logic to run more sophisticated operations.
I have used Windows PowerShell to automate some of my SAS-related processes, such as batch processing with SAS Enterprise Guide. I’ve also used it within my development work to gather metrics about files, computers on the network, and running processes — all of which are interesting activities for a system administrator. Because Windows PowerShell allows you to gather different types of information and easily save it in CSV files, it’s a convenient way to generate data sources for further analysis using SAS.
In the near future, I intend to share with you a few examples that combine SAS with Windows PowerShell. But before I do that, I need to share some basic information for getting started with PowerShell, because there are a few “gotchas” you might experience as a new user.
Where to find Windows PowerShell
If you are running Windows 7 or Windows Server 2008, Windows PowerShell is built in. Earlier versions of Windows Vista or Windows XP might not yet have it, so you would need to download it from Microsoft’s Scripting Center.
Once downloaded, you should be able to find various shortcuts in Start->All Programs->Accessories->Windows PowerShell. On a 64-bit system you will find 4 shortcuts, as shown here:
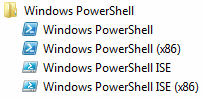
In my experience, I almost always use the x86 versions of the PowerShell engine. These allow me to work with most aspects of the system, plus my favorite 32-bit applications such as SAS Enterprise Guide or Microsoft Office. I can still drive other 64-bit applications as long as they are launched out-of-process.
The Windows PowerShell (x86) shortcut invokes a command prompt environment, reminiscent of the familiar DOS shell (but a little fancier). The Windows PowerShell ISE (x86) shortcut opens the Integrated Scripting Environment, which presents a program window, command window, and an output/log window (gee, why does that seem so familiar?).
Enable Windows PowerShell scripts to run
Here’s the most baffling part about getting started with PowerShell: by default, you cannot run PowerShell scripts on your system. It’s a capability that comes as disabled out-of-the-box. You can run script commands from the console, but you won’t be able to execute scripts that are saved as PS1 files. If you try, you will see an error message with text similar to this:
File C:\Test\TestScript.ps1 cannot be loaded because the
  execution of scripts is disabled on this system.
  Please see "get-help about_signing" for more details.
At line:1 char:23+ .\Test\TestScript.ps1 <<<<
  + CategoryInfo
 : NotSpecified: (:) [], PSSecurityException
 + FullyQualifiedErrorId : RuntimeException
This default policy setting is presumably for your own safety, though I must admit I don’t understand it. Fortunately, you can easily change the policy by using the Set-ExecutionPolicy command:
Set-ExecutionPolicy RemoteSigned
Run this command from the PowerShell console, select ‘Y’ to confirm, and you’ll now be able to run local PS1 files on your PC. (“RemoteSigned” indicates that local scripts will run, but scripts that you download from the internet will run only if they are signed by a trusted party.) You can read more about setting these policies for running scripts in the Windows PowerShell Owner’s Manual.
A quick PowerShell example
Earlier in this post, I promised that Windows PowerShell makes it easy to collect system information and save it as CSV. Once we have it in CSV format, it’s easy to import and analyze in SAS. Here is a simple example that you can run from the PowerShell console:
Get-Process | Export-CSV -Path ./processes.csv -NoTypeInformation
The Get-Process command generates a detailed list of the running processes on your machine. The output is piped to the Export-CSV command, which drops the result into a file named processes.csv in the current directory. That file is then easy to import into SAS using SAS Enterprise Guide (or by writing your own SAS program).
| This post was kindly contributed by The SAS Dummy - go there to comment and to read the full post. |